Procedure for repairing the SD10
by Jim Marcoz, Owner, J. Marcoz Emergency Vehicle
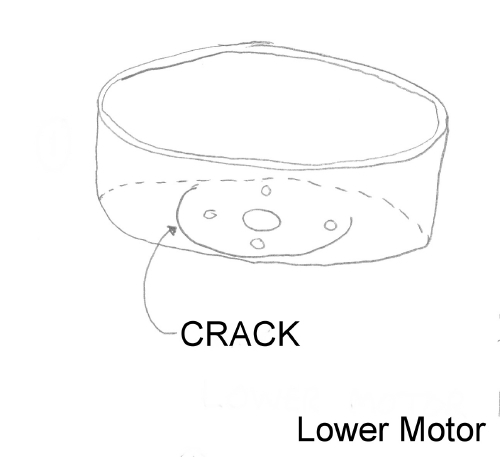
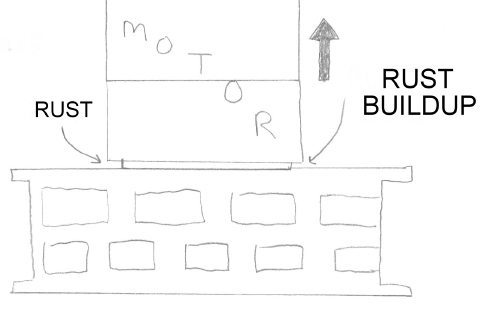
The lower motor housing had a crack that extended 180 degrees around the inner edge of the casting. This was caused by years of rust buildup in the gap between the blower housing and the motor. This rust built with such force that it cracked the cast iron! With the whole motor sitting crooked, this caused the stator to also be crooked and it was rubbing on the inside of the blower housing. This is what made the siren produce the “sick cow” sound.
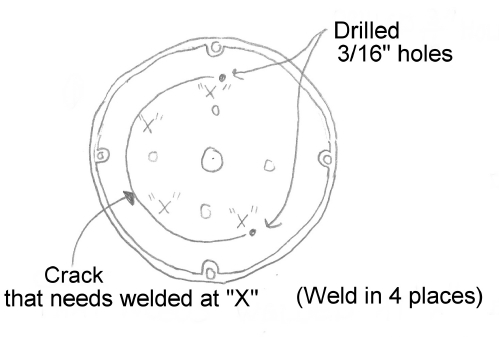
With the unit already disassembled, the motor end (lower) was sandblasted to make it easier to work with. The ends of the crack were drilled to prevent spreading of the crack. Three people attempted, without success, to weld this casting. Upon X-raying the casting, it was found that the “casting” was actually a composite forging of cast iron and cast steel- composite as in two pieces!
The crack was instead “tack” welded in four places since the metal was so contaminated with impurities from age and couldn’t be welded. After almost giving up, the idea on how to repair the piece hit me. Here’s what I did after the housing was tack welded.
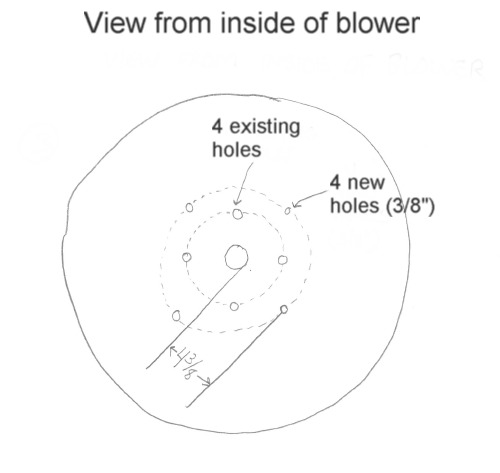
I cleaned the surfaces of the blower and the motor where they met. Lining up the original motor mount holes, I inserted and tightened the bolts. I flipped the assembly over and from the motor end I used a 3/8” diameter center punch and marked four holes on the blower housing using the MOTOR HOUSING TO MOTOR MAIN BODY bolt holes as the locating guide. The housing was now removed from the blower and the four punch marks in the blower were drilled out to 13/32”.
Doing this will allow you to bolt the motor all back together, but this time, the motor’s bolts will need to be longer and will also go through the blower. Throw away your bolts that originally held the motor-end housing to the motor body (the countersunk bolts.) Go purchase 4 new bolts and flat washers. Size: 3/8”-16 X 4 ½”, GRADE 8 !!!!!
If you were to put this all together now and tighten the new bolts, the assembly would crack because of the gap between the blower and motor. Now what, you ask?
Align the motor end onto the motor body and make sure the holes all line up! Grease the previously cleaned mating surfaces of the motor and blower. Now install the blower housing onto the assembled motor keeping in mind that the four new holes in the blower must line up with the four holes on the motor. Insert the four new bolts and washers into the holes and start the threads and run them down JUST UNTIL THEY TOUCH!!!
Go to your local front-end alignment shop or an auto parts store and get an assortment of front-end alignment shims for a 1970 to 1985 GM rear wheel drive car. Get the thinnest two sizes and get enough of them to stack up to about 1 ½” thick overall. These shims will be inserted in the gap at the location of the four through bolts (between the blower and motor.) For now, just pack in as many of them as you can get in there at all four locations. We’ll get back to this in a moment. Snug the bolts to about 5 ft./lbs. WITH A TORQUE WRENCH!!!
![]()

Okay, let's leave this assembly alone for a while and play with the rotor (stator). Before anything, inspect the rotor for cracks. If it’s cracked, it’s junk. Find a new one (good luck.) If it’s okay, we’re ready!
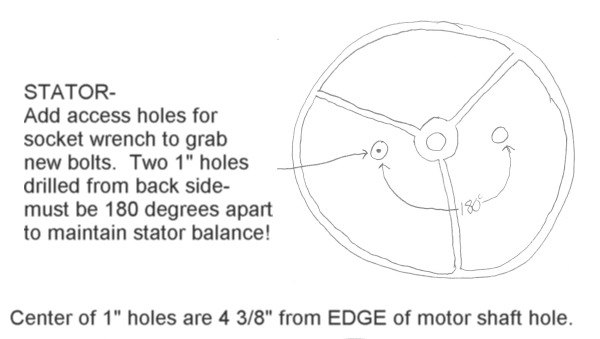
Polish any scratches on the outside diameter of the rotor where it may have contacted the inside of the blower housing. Now lay the rotor on the bench with the rear facing up (the rear is the side without the fins or vanes.) We need to measure 4 3/8” from the EDGE of the motor shaft hole outward and make a center punch mark. Do this again at 180 degrees away from punch mark. This is VERY important. If you don’t get it 180 degrees, you will disrupt the balance of the rotor and trash the whole siren when you turn it on for the first time!!!
IMPORTANT!
After making the two marks, make sure that they are far enough away from the three vanes on the other side of the rotor. These holes are going to be 1” diameter, so make sure they are far enough away or you will drill into the vanes and destroy the rotor!!! If they appear too close, just remeasure and make two more punch marks so they’re away from the vanes.
Head to the drill press and drill these punch marks out with a 1” hole saw or other suitable bit.
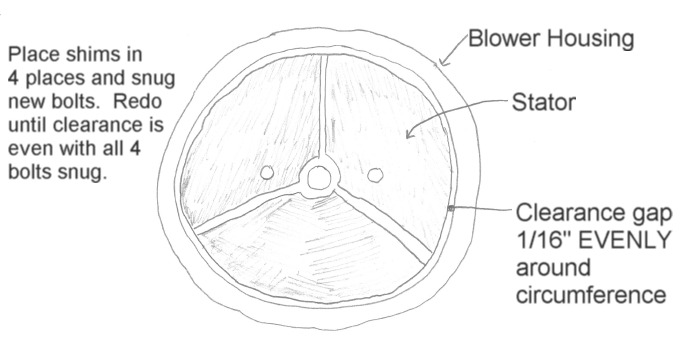
De-burr the holes. Install the motor shaft key, oil the shaft and install the rotor onto the motor shaft and in the blower housing. If an edge of the rotor hits the blower housing, you must loosen the four bolts and take shims from the area where the interference is and transfer them to the bolt that is 180 degrees across from it. Some prying may be necessary to get the shims in the other side. Once you play around with this and get the rotor fully seated onto the shaft, install the rotor-to-shaft plate and three bolts using blue Loctite thread locker. MAKE SURE THE ROTOR TURNS FREELY!!!
At this point, your rotor is installed and bolted on and spins freely. Measure the gap between the rotor and the blower housing at EIGHT places 45 degrees around the rotor. You need to get this gap completely even the whole way around the rotor. This is the job of the shims. If there is a tight side, remove shims from that side’s bolt and reinstall them 180 degrees across from where they were removed from. Re-tighten the bolts to 5 Ft/Lbs each time you move shims. You will use a 9/16” socket and extension through the new holes in the rotor to access the bolts. Keep playing around with this until the gap is even. This procedure is not really easy and took me about 2 hours to get everything properly adjusted, but you have to do it or the siren will fail. Once the gap is even, remove the bolts ONE AT A TIME and apply Loctite to the threads and reinstall to 5 Ft/Lbs. before going on to the next one. Once all four are back in, torque them all to 25-30 ft/lbs. As the torque reaches its peak, you may feel that the wrench begins to “feel easier” to turn. This means that the threads are ready to fail in the motor. STOP!!!! Let the torque there for that bolt and finish the rest of them. When all four are torqued, check the gap once again. It should not have changed. Guess what? YOU'RE DONE with the mechanical assembly. Give the rotor a good spin and listen to the growl being careful not to stick a finger anywhere near the chopper holes….unless you want nine fingers!
Put the rest of the unit together and paint it with a weatherproof oil-based paint and SEAL THE TOP SHEET METAL HOUSING!!!!!!!!!!!!!!!!!!!!!!!!!!!
If you are restoring an SD-10 and this works (it will!), you just repaired a siren that until now, was supposedly unrepairable when this part fails. You can get on your knees and bow to me and say “Oh, Jim, you are the almighty Federal SD10 god. I wish I were more like you!”
DISCLAIMER:
These procedures are not approved by Federal Signal Co., or anyone else for that matter. Jim Marcoz or J. Marcoz Emergency Vehicle will not be held liable for anything that may happen to you, others, your siren, property, or any situation that may arise from you trying to do the above procedure. We do not endorse doing this modification. Do not do it. If you would attempt it, you must have intense mechanical knowledge and skill. By doing this procedure, you accept the responsibility of anything that may happen. You are doing it- not us. We are not there. We did not tell you to do it. We told you NOT to do it. Do not do it, even though it works. Maybe I just got lucky? (nope, I’m just good!) Okay, now that you are going to do probably do it anyway, PLEASE BE CAREFUL….these machines can be very dangerous. Professional stunt engineer/technician. DO NOT ATTEMPT THIS!!!
You can lose a finger if it gets stuck in a chopper port. A rotor failure/explosion can throw shrapnel for a great distance and injure or kill anyone nearby. Have a reputable machine shop help you if you are the least bit skeptical about anything you are about to try (that you were told to NOT try!)
Install the screens on the intake and exhaust side of the blower housing too!
Once it’s all together, you can connect the siren to a power source while on the floor, but use ear plugs AND headphone type protection. This thing will make 125+ decibels at close distance. You can lose your hearing in a hurry. You can lose your hearing in a hurry. You can lose your hearing in a hurry. ANYONE nearby can lose their hearing in a hurry. You or anyone nearby can get injured if your repair (which you were told not to do) would fail in operation.
If in doubt, DON’T TRY TO DO THIS!!!
I think you get the picture.